AI-102 Azure Computer Vision Implementation & Study Guide
Introduction to Azure AI Computer Vision
Overview
AI services around vision have become a core function as we look to replace human tasks. Much of what we do revolves around looking at objects (hence vision) and deciding what we want to. In many cases for a computer to work with objects, we need them to be stored as an image we can then conduct image analysis upon.
Image analysis in Azure involves using pre-built Computer Vision APIs to extract meaningful information from images. Emphasis here is on pre-built/pre-trained models. The Azure Computer Vision service allows you to do the following common tasks:
Detect objects and generate descriptions of them
Detect people and characteristics
Remove backgrounds
OCR (Optical Character Recognition) allowing you to read text in images
Generate thumbnails
Analyze color schemes
Analyze content for safety, e.g. adult content.
Recognize products
All of these capabilities can be combined to help add intelligence to applications (for example, creating alternative text for images or sorting pictures by content) without requiring you to train a model from scratch.
Tip: There is another service called Custom Vision which will be covered later. The difference with custom vision is that you will train those models vs the Azure Computer Vision service which already includes pre-trained models.
Core Concepts and AI Services Foundation
First, you will need an Azure Computer Vision Resource provided via an Azure Computer Vision Service endpoint. This is often called Azure AI Vision for short and was previously referred to as Cognitive Services. The service & endpoint is what provides access to the pre-trained vision models.
You need to provision this resource as a standalone Azure Computer Vision Resource or leverage it as part of multi-services included in Azure AI Services
Tip:
Azure AI Services – This is provides multiple AI services including an Azure Computer Vision endpoint.
Azure Computer Vision Resource – Use this to deploy an Azure resource that is used only for computer vision
Once your service is deployed, you will access it to obtain an endpoint URL and an API key for authentication. Without the endpoint and key, you cannot consume these services.
Service Features (Accessed via API):
Once you have your Azure AI Services up and running with your Computer Vision endpoint, it’s important to understand what you can do with that endpoint. There are multiple APIs which you can leverage.
✅ You get access to Image Analysis, Read (OCR), Spatial Analysis, and Background Removal directly with the Azure Computer Vision resource.

Note:
You DO NOT get:
Custom Vision (Train your own models)
Face API (Face detection/verification)
Form Recognizer (Document data extraction)
Video Indexer (Video understanding at scale — separate service)
Those need separate resources or Azure AI Services multi-service accounts.
Tips:
Image Analysis 4.0 is now the default entry point for most visual tasks. Image Analysis 4.0 also combines OCR, tags, captions, dense captions, embeddings, object detection, and background removal into one unified API call.
API Call and Response:

The Computer Vision API works where you send a call and get a response, for example when you use the image analysis API function where you pass an image (via URL or binary data) along with requested features. The response is typically in JSON (or an SDK returned object) containing the results (e.g., a list of tags with confidence scores, descriptions, and detected objects with coordinates). You need to then interpret and take action upon this response in your application.
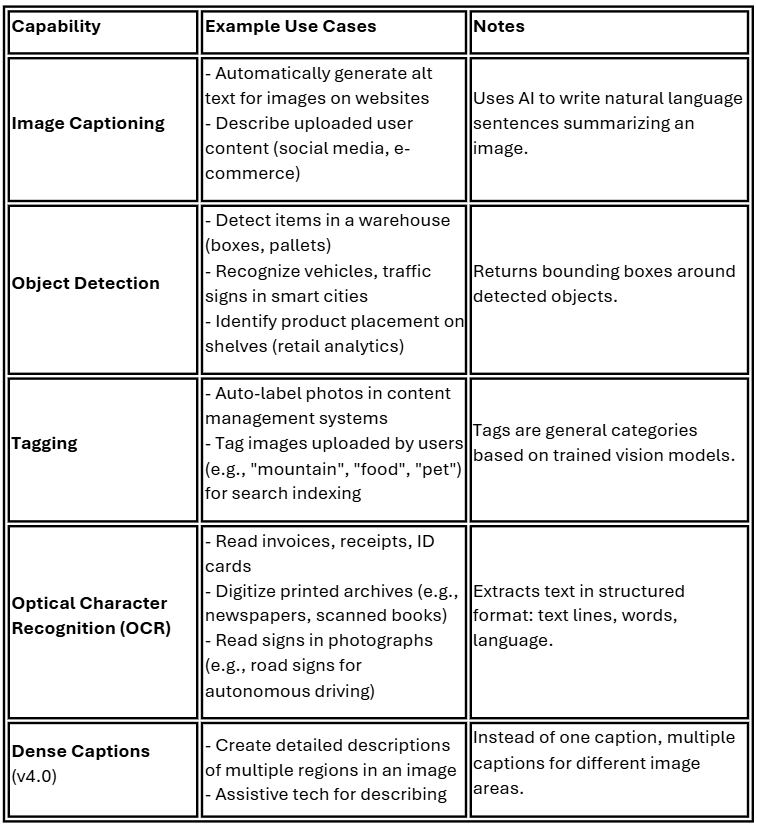
Use Case Examples:
As you can see, there’s a lot of power via a simple API call, and many use cases. Here is a detailed breakdown of common use cases: